
NOTE: I cannot emphasize enough how important it is to be informed of the risks and challenges on this hike. I recommend saving this webpage via your phone’s web browser if you want to access it while on the circuit. If you want to read my personal recap of the hike, you can read my post here.
What is the Huemul Circuit?
The Huemul Circuit is quite possibly the best hike in Patagonia, and in my opinion easily one of the top 5 hikes in the world. It is extremely challenging since half the trail is unmarked and you have to rent equipment to cross two Tyrolia ziplines over rivers (with the option to ford both rivers with good hiking sandals).
It is a 3-4 day trek near El Chalten, Argentina, best done from December – March (Oct – April generally); it runs about 40 miles / 65 km, requiring a free permit.
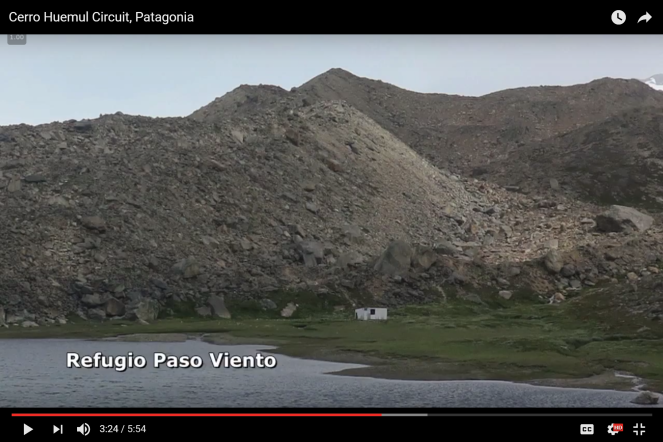
Given its unpredictable weather and technical nature, it’s rarely trafficked, seeing anywhere from 0-10 parties on the trail at a time. This makes it a particularly unique experience and arguably Patagonia’s best hidden gem. This short video summarizes the trek very well.

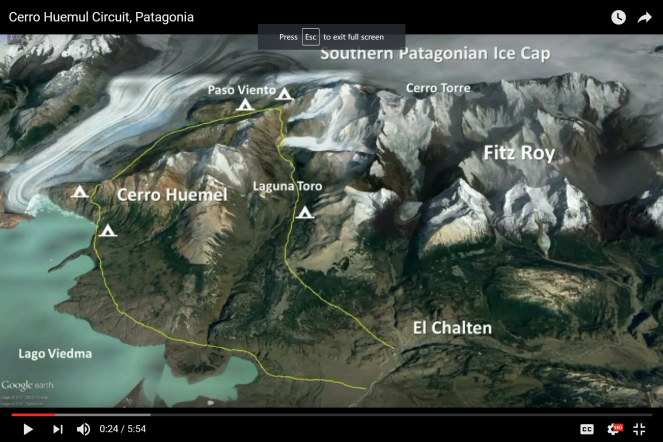
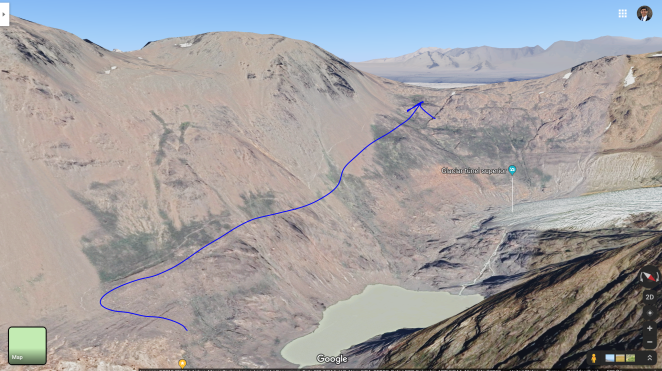
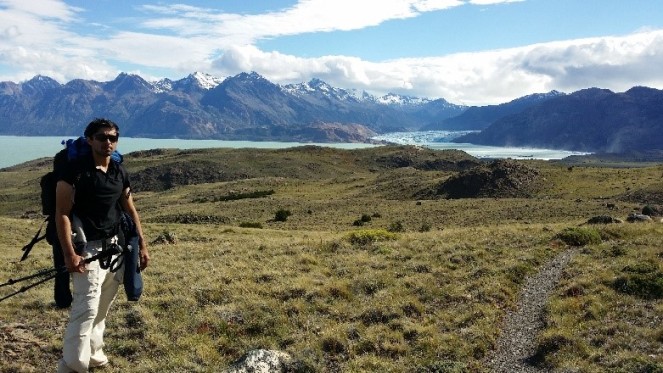
What makes it one of the top 5 treks in the world is that it enables you to see the South Patagonian Ice Fields, the 3rd largest reserve of fresh water in the world behind Antarctica and Greenland. While you may commonly see glaciers in Patagonia, all these glaciers come from the Ice Field, which you usually can’t see since they’re hidden behind mountain peaks like Fitz Roy and Huemul.

Above, you can appreciate the mesmerizing perspective of the ice fields you get from Paso del Viento on Google Earth (the end of the blue arrow)
You can catch glimpses of the ice fields in Torres del Paine National Park from the John Gardner Pass, but this is one of only 5 treks in Patagonia that enable you to see a 180 degree panoramic view of it (of those 5, the Huemul is the easiest).
Should I hire a guide?
A guided tour is probably at least $900/person or so, depending on how many people you do the tour with. I would STRONGLY recommend AGAINST this because of the unpredictable weather.
If you book a tour but the weather is bad, the trekking agency can cancel the trek (or you do like 25% of the trek) and you won’t get a refund. Use this money instead to buy hiking/camping gear which you can use for years to come.
You should first get to town, assess the weather, and then decide to start the trek in good conditions. If you’re by yourself, it’s worth the extra effort to find people in town to go with (asking around in hostels, restaurants).
However, if you have the money and really want to get a guide, you can take a little bit of risk; this trek is a lifetime experience that may be worth a guide for some people.
Where is the Huemul Circuit?
The Huemul Circuit is located near El Chalten, Argentina in El Parque Nacional Los Glaciares. To get here, fly or bus into El Calafate, Argentina and then take a 3 hour bus to El Chalten.
It is a 4 day trek (40 miles / 65km), but you can do it in 3 days too (or 12.5 hours if you’re a seasoned trail runner)
Before you can set off, you must register with the park rangers. It is free, but if they catch you on the trek without a permit, there’s a 100 USD fine. They do this so that if you don’t return around your estimated finish date, they know to send a search and rescue for you 48 hours after your return date. It’s that type of trek.
They don’t advertise the Huemul compared to other famous hikes in El Chalten since it’s more precarious. You have to actually approach them about it, and they will also be keen to emphasize the dangers of the hike to you.
They make you watch a small video on it at their office. I recommend taking pictures of each slide as it provides useful navigation information.
The rangers office opens at 9 AM. If you want a permit to leave at 7 AM the next day, get your permit and equipment the day prior. Usually the stores you rent equipment from won’t charge you for the day before you start a hike.
How do I navigate when much of the trail is unmarked?
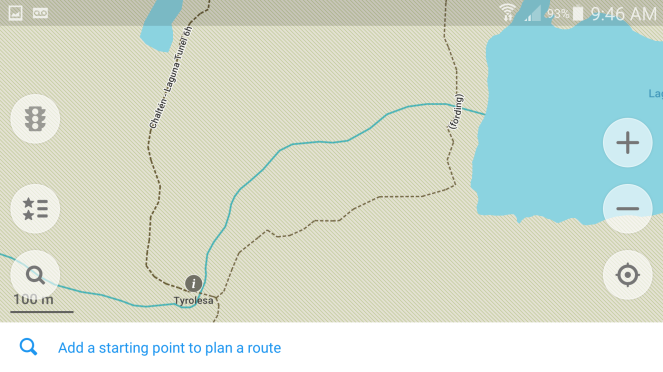
Download the maps.me app on your smart phone (iPhone or Android), and then download the whole map of Argentina (or Patagonia + the Ice Field section), which has the Huemul Circuit labeled.
Maps.me is peer-reviewed (based on other people’s routes), so don’t follow it religiously, and use your best judgment when you need help finding the trail.

With your phone in airplane mode, turn on the GPS. Even though you have no mobile data, your phone will still locate you, though it will take longer compared to if you have cellular data. This also works with Google Maps if you pre-download a section of the map while you have internet, but the Huemul Circuit is not labeled on Google maps. As long as your phone is in airplane mode, even with the GPS on, this does not use cellular data and you should not be charged anything.
You can use this for traveling anywhere in the world. It has countless hikes worldwide labeled on it, as well as restaurants, hotels, etc. It’s arguably better than Google Maps when you don’t have internet connection or when you’re hiking.
You don’t want your battery running dry on the circuit if you plan to use your phone for navigation, and photos as well. You should DEFINITELY buy an external battery charger (I like Anker batteries on Amazon). Make sure you keep your battery products warm during the night (e.g., in your sleeping bag) since cold weather will drain the battery quickly.
Don’t use the GPS function itself constantly since it does use drain your battery pretty quickly.
GPS is not absolutely necessary to do the hike. Regardless, you need to buy a $10 waterproof/tearproof map of the Ice Field in El Chalten, which includes the Huemul Circuit; this is mandatory to have for the hike, and is nice if your GPS doesn’t work.
What is the best time of year to do the hike?
With Patagonia being in the Southern hemisphere, December – February is the best time to do the Huemul Circuit (the Patagonian summer). The temperature will be better and you shouldn’t see much snow (if at all) on the trail, but the winds can be stronger and there will be far more crowds. Importantly, there will be ample daylight (5 am – 11 pm will still give you decent daylight).
October-November and March-April will be colder, but you will see less crowds and wind. Notably, you may see more snow on the trail, and rarely it can make passage on the trail difficult. During April, you will see Fall colors; if you can catch it at the right time, I think one can argue this is one of the best times to do the Circuit.
If I were doing it a 2nd time, I’d aim for the off season (you have a more challenging weather window, but less crowds now that the trek is getting more crowded).
I would absolutely recommend against doing this trek in the Patagonian winter (May – August). The town of El Chalten practically shuts down during this time period. You may not even find many hostels open (only a handful of hotels are). There’s considerably less daylight, and there would be far less support from the park rangers should you need help.
What equipment do I need?
You need gear for using a zipline. You can rent it in town. In order to secure a permit, you will need to have:
- 1 harness (per person) such as this one
- 2 carabiners (per person, usually one steel and one aluminum),
- 1 safety line / sling per person,
- 1 thin cord / rope of 35 meters (to recover the pulley);
- You need to buy this at a hardware store in town, you can’t usually get it from normal hiking stores, but you can still ask
- A $10 topographic map of the circuit (bought in town)
- Cooking stove (no open fires allowed)

There are numerous places in El Chalten where you can rent this equipment from (the park rangers can show you which ones).
If you want to get a rough idea of what using a zipline is like, you can watch this short video. But make sure you fully understand how to use the equipment from the rangers when you bring it to them to get your permit (make sure to ask them how to do the whole sequence, including using the rope to recover the pulley)
You can also bring your own zip-line and harness equipment in advance. It would probably be ~100USD. I may recommend this; you’ll be more familiar with it, and won’t have to deal with any potentially extortionate rental shops. I don’t remember exact prices ($25-35 for 4 days maybe?), but it could be good to have for the future.
MOREOVER, you also never know if lots of ppl do the trek on one day and all the shops run out of harnesses. I’ve read trip reports of this almost happening, and myself almost didn’t get the gear.
Though, if you are set on not bringing your own gear (e.g., you’re backpacking for many months) you will also probably be fine getting it in town. Just ask the shops/rangers in advance when you get into town to know where to get it from. As the trek gets more popular, more and more shops are carrying the gear.
How do I use the harness / zipline?
Ask the park rangers to demonstrate. Ideally, you should be able to rehearse it in front of them flawlessly, and then be able to teach it to someone else, to ensure you have no uncertainty about using it. Otherwise, here’s a nice excerpt from the folks at Switchback Travel that talks about to use the zipline:
- “Your first point of connection is the non-steel locking carabiner, placed directly between the belay loop of your harness and the pulley.
- Make sure you have a backup. The easiest way to do this is to attach the safety line from your harness to the cable with the steel carabiner.
- To attach your backpack clip it directly to the steel carabiner as well (via the haul loop on your backpack, or better yet, via the haul loop and one more attachment point, such as a shoulder strap).
- When you dismount from the Tyrolean, first detach your pack and secure it behind you on steady ground. Then, stabilize yourself and undo your carabiner from the pully. Before releasing the pully, you’ll likely want to attach the steel carabiner (if you only have one) to return to the other side for the rest of your party to use.
*Note: always put the steel carabiner (not aluminum) on the steel wire.”
Do I have to use the zipline?
No. I didn’t end up using this equipment at all on the trek, funny enough. Both rivers can usually be crossed by foot, most of the time, but the park rangers won’t give you a permit unless you have the equipment.
Read my section below detailing Day 2 if you want to see what the river crossing look like on foot. If you’re lucky with the water level, the most treacherous one (the first crossing) isn’t that bad at all. The second river is harder (but very doable) on foot. I would NOT ford the river if you don’t have hiking sticks or a stick you pick up from the trail.
If you intend on just fording the rivers (there are other trip reports where other ppl did it, and a guy who did this hike in 12.5 hrs also forded the river), I’d recommend bringing good, lightweight hiking sandals or crocs that fasten around your foot (go on amazon or whatever website to find good small ones).
These also double as sandals at your camp. You don’t want to wear your hiking shoes after a long day of hiking, so it’s not too much unnecessary weight.
If you’re a party of two, you can use the rope (required for your permit) to aid your river crossing, assuming it’s long enough. Tie it around yourself, and leave the other end with your other party member to hold incase you fall in the river (even while you have your hiking sticks). Once you cross, they can tie their end around themselves, and you help them cross.
I did not personally do this. And it’s not necessary like it is when you do mountaineering. But I would consider it if I did this hike again (more out of abundance of caution, as the crossings aren’t that bad)
What other gear should I bring?
Below I lay out hiking and camping gear you should consider, with some links to personal recommendations on Amazon. Even if some of it is pricey, hiking gear is a great investment that you use for years.
You can easily rent some bigger equipment in El Chalten (including tents, sleeping bags/pads). This is what I did. Don’t let this turn you off though; the trek is free to do and it’s an experience of a lifetime.
I’d also recommend checking out SwitchBack Travel’s website for gear recommendations. They have useful reviews and perspectives.
Navigational Gear
If you’re an outdoors enthusiast and are hiking in solitude without cell reception, I’d consider investing in either a Personal Location Beacon (such as this one). If something happens and you have no internet reception, someone will at least be able to alert authorities to your location.
If you’re a very serious hiker, then consider a GPS type device (where you can see terrain, send messages on a contract basis, etc). They are certainly not cheap. But being able to call for help from anywhere, or send your family daily updates on your location is a great luxury.
Hiking gear
- Long sleeve synthetic base layer as your hiking shirt; there’s a hole in the ozone layer in Patagonia, so this protects your arms. Short sleeve is also fine, but make sure it’s SYNTHETIC (absorbs sweat well)
- Hiking pants. I like prAna Stretch Zion pants. They are pricey ($80 or so), but are extremely flexible and useful for hiking. I would NOT wear shorts even if you feel hot so that you protect your skin from thorns / ranches.
- Belt
- Trekking poles (I cannot recommend these enough)
- Hiking hat (it’s oftentimes sunny; DEFINITELY bring one!)
- Hiking socks (I HIGHLY recommend investing in a few pairs, not just regular socks). Darn Tough socks are expensive but they are the best.
- Underwear / boxers (ideally ones made for hiking / sports, not just cotton). Ex Officio underwear is also pricey but super comfortable for hiking.
- Sunscreen (especially for your face / hands). A small bottle will do. DO NOT forget this.
- Polarized sunglasses (ABSOLUTELY bring these; polarized, not just UVA+UVB)
- Water bottle with filter. Many options exist, but Sawyer filters are great. You can also youtube how to use it.
- Hiking shoes (hiking boots also). You should get 1/2 a size higher than your usual size. This is very important to reduce risk of blisters when you are going downhill since this is where your toes rub against the shoe. It is absolutely essential you test any hiking shoes while going downhill. You won’t feel this same friction walking straight or going uphill.
- Personally I love Saloman’s X Ultra 3; there’s also waterproof (Gore-tex) versions, and also boot versions that give more ankle support.
Camping Gear
- Smartphone (with maps.me installed and the Argentina map downloaded)
- External battery charger
- Misc electronics, cameras
- 3 or 4 season tent, ideally for 1-2 people
- Large backpack (60-80L; 70L is probably a good balance)
- Sleeping bag rated for freezing temperatures, preferably -9C.
- Sleeping pad (to put the sleeping bag on)
- Jet Boil or stove to boil water (former being more expensive; latter is fine too)
- Lighter
- Cooking pot
- Gas canister (purchased in El Calafate or El Chalten)
- Collapsible bowl and utensils (fork, knife, spoon, etc). You may not need the bowl if you just eat straight out of the cooking pot.
- Garbage bags (to put your hiking gear into in your large backpack; you can bring multiple bags for each item. From my experience it’s better to put all your gear in waterproof bags inside your backpack, rather than covering your backpack with a rain-cover which inevitably becomes a parachute when it’s windy).
- Gloves
- Crocs or hiking sandals (these are nice to walk with at camp when you don’t want to walk around in your hiking shoes, and fording rivers too)
- Toiletries (toothbrush, toothpaste, contact lens solution, glasses, small SOAP BAR)
- Toilet paper (don’t forget this)
- Baby wipes (you can use these to clean up and as toilet paper, rather than showering)
- Basic first aid kit (alcohol wipes, band-aids, athletic tape (incase you sprain an ankle), topical anti-bacterial cream).
- Headlamp ; this is preferred over flashlights since flashlights occupy one of your two hands. Trust me on this.
- A winter hat
- Neck cover (when it’s windy, you’ll want your neck covered just as much as your head/ears. Trust me)
- Medium thickness long sleeve base layer. Ideally merino wool, which is best at keeping you warm.
- Waterproof rain jacket (it can be really thin and layer up on your thicker jacket, but should be waterproof). It’s best to get 3 layers (sweater, synthetic jacket, waterproof shell) rather than one giant jacket.
- Down jacket or synthetic jacket. This will keep you warm at camp. Any will do.
- Leggings / tights/ thermal pants; these take up VERY little space in your bag and keep you warm at camp, w/o wearing your hiking pants
- Thick wool socks (ideally merino wool which will keep you warmest) to wear at camp
Food / Nutrition:
El Chalten doesn’t have many quality grocery stores, though it’s still adequate for what you minimally need. I’d recommend bringing your favorite food with you in advance (or from El Calafate/Buenos Aires)
Whether you do the trek in 3 or 4 days, I would bring at extra day of food for two reasons: 1) You burn so many calories and you won’t regret having extra food 2) if the weather changes suddenly while you’re on the Ice Fields, or you need to wait out the weather at Laguna Toro before attempting the first mountain pass, you may end up staying another day or two than expected until the weather improves (it’s not very common, but I’ve read numerous trip reports of this happening)
There’s nothing worse than abandoning your hiking plans b/c you didn’t bring enough food. Even if you’re just going to Paso del Viento (2 days / 1 night), then bring 3-4 days of food (ppl have been known to sometimes wait 2 days for conditions to improve)
Breakfast: Instant oatmeal (first get the water to a boil, then pour it in). I recommend mixing with milk powder. Can then mix with peanut butter, nutella, jelly, cinnamon powder.
Lunch: I recommend tortillas. They don’t get smushed like bread does and are small. You can put peanut butter and jelly in them. Bring cheese as well!
Dinner: for carbs, I recommend couscous (with some sauce). Pasta is also good, but couscous is in my opinion better in terms of weight. If you can plan in advance, I recommend getting dried meals in a bag (where you pour it into boiling water and it’s ready). Like this one from REI. They’re lightweight and easy to cook.
Snacks: dried nuts (almonds, cashews), protein bars, boiled eggs (they weight a good bit but have great protein). Soup packets (for when you’re cold). CHOCOLATE!!! You need to treat yourself. Hiking is a great excuse to eat anything.
Ideally, one should consume at least 3,000 calories a day when hiking all day. It sounds like a lot, but trust me, you’re burning A LOT more than that. Food will be the heaviest part of your bag, but it gets lighter each day of the trek.
Remember, 1g carbs = 4 calories, 1g fat = 9 calories, 1g protein = 4 calories. Carbs are physiologically the best source of energy for your body, but fats will give you more calories per gram.
From a health perspective you ideally eat at least 50g fat/day. And you should consume a good amount of protein in your diet (ideally .8g/kg/day, or about 50-60g protein/day). If you don’t consume enough protein, you’ll likely end up losing more muscle mass than you’d like. You’ll definitely lose some weight when hiking, but try to minimize your muscle loss by eating an adequate amount of protein.
If you’re traveling from abroad, it’s good to pack some protein bars, or even bring some protein powder with you.
Do I need to bring water with me?
You do not need to bring water with you on the trek; the park authorities officially state that the water is safe to drink in the national park (preferentially from running water). It comes directly from glaciers (which is fresh water) and tastes AMAZING.
Still, I would DEFINITELY buy a water filter in advance. You never know if some random bird or animal contaminates the water.
I would avoid getting water in areas of the trek where you see a lot of cows since they can easily contaminate it. And if the water is not running, don’t drink it without a filter.
Footwear and Hiking Sticks
I also recommend either hiking sandals or light croc sandals (see picture below) if you need to ford a river (big or small) by foot and don’t want to get your shoes wet, as well as to use at campsites.

Hiking sticks are also extremely helpful; I can’t emphasize that enough. Even if you’re super fit, I advocate for hiking sticks to help your knees. A couple of people who did this trek in 17 hours used hiking sticks.
As for optimal length of hiking sticks, when you’re gripping the top of the hiking sticks, the angle between your forearm and arm (or angle of elbow) should be 90 degrees. And if the hiking sticks have straps attached to them, these straps should wrap around near where your wrists / forearms are so that you can put more of your weight on the sticks.
The park rangers told us before the trek that we should have shoes that have ankle support given that you walk on a glacier at some point. We walked with regular hiking shoes and were fine. But as I’ve found out later, hiking boots (with good, high ankle support) are particularly useful if you’re carrying a heavy backpack. This usefulness is not as profound if you’re just doing a day-hike with a low weight backpack. So consider getting good hiking boots, but know that they’re not necessary.
Weather
The trek is easily to be found in good weather, but can get difficult. Weather in Patagonia in general is unpredictable because of the influence of the massive ice masses. In a span of 30 minutes, it can literally go from sunny, to rain/snow, and back to sunny.
It’s CRITICAL to do Days 2 and 3 in good weather given that you ascend steep, exposed mountain passes (Paso del Viento and Paso Huemul, respectively). It’s okay if you have to do Days 1 and 4 in thorny weather since these days are relatively flat and unexposed.
Because much of the trek is directly exposed to the Patagonian Ice Field, wind speeds can get quite high (hence why they call the first mountain pass Paso del Viento). When I did it, I saw wind gusts up to 100kmh when ascending the 2nd mountain pass, Paso Huemul (per my video below).
You can also check the wind speeds for Paso del Viento on the windguru website once you’re in town; the park rangers post weather and wind forecasts for each day at their office and will guide you on whether you should attempt the trek or not (b/c you don’t want to get stuck behind the mountain ascending a mountain pass with winds like in this video).
What if I want to do this hike by myself?
This trek is nothing like the O circuit on Torres del Paine where it’s mostly non-technical trekking and you have park rangers at every campsite. Here, you’re on your own. Unless you’re very experienced, I’d consider getting the personal locator beacon. It’s pricey, but you can’t wholly depend on other trekkers to help you if something goes wrong.
If you do this alone, you should be fit, have good orientation skills, and some outdoor experience. You should know how to cross rivers if necessary, navigate in loose terrain (e.g., some very rocky parts), and not be afraid of heights.
I HIGHLY recommend going with someone else. If you’re a backpacker, you can keep asking around town until you find some people to go with. But make sure whoever you go with is physically able to do the trek and knows what they’re getting themselves into.
Or, as some solo hikers who commented below have said, if you read this guide thoroughly, you will be very well prepared too even if you go solo 🙂
What if I just want to see the ice fields from Paso del Viento?
Many people do this without continuing on the rest of the circuit trail. It is a great option if you’re short on time. It would be a minimum 2 day / 1 night trek.
You could trek to Laguna Toro for day 1 and then head up to Paso del Viento on Day 2 before heading back to El Chalten. The benefit of this option is you can leave most of your camping gear at Laguna Toro. You can then just go up to Paso del Viento with a daypack (or minimal gear), making it very easy.
Or, you can make a push to Laguna Ferrari from El Chalten on day 1 (see my Day 2 section below), and then back to Chalten on Day 2. The benefit is you get to see the Ice fields an extra day, but then you have to carry your gear up and down the mountain pass.
From Paso del Viento you see the most beautiful part of the ice fields, but the rest of the circuit trail gets you additional and sensational views of the field and the Viedma Glacier. I would definitely recommend it if you have the time.
Should I do the trek in 3 or 4 days?
My personal advice: aim for the usual 4 days, but if you’re fit and up for it, consider doing Days 1+2 together if the weather window is good for the Day 2 part. You would need to leave El Chalten around 7 am in order to reach Laguna Toro by noon, before ascending Paso del Viento if the weather window is good.
The big advantage with this approach is you can choose to spend an extra day at either of the two campsites (Paso del Viento or Lago Viedma). The Lago Viedma campsite is one of the most idyllic places I’ve ever been to. I think it’s worth considering spending a 2nd night there and just exploring around the hills, meadows, and mountains.
Day 1 is from El Chalten to Laguna Toro (16km). You have the option of doing a 5 mile side trip to Loma del Pligue Tombado to get a 360 degree panorama of the whole park. You can always do this as a separate day trek, which I did.
Day 2 is from Laguna Toro to the Paso del Viento Refugio or Laguna Ferrari (including an ascent up to the mountain pass, Paso del Viento.
Day 3 is from the Paso del Viento Refugio to a campsite near Lago Viedma (18km) where you ascend up the 2nd mountain pass, Paso Huemul
Day 4 is from Lago Viedma to Bahia el Tempanos boat terminal (18km) where you can usually catch a ride back to El Chalten.
Usually this trail is done counter-clockwise. Rarely, it can be clockwise, though I wouldn’t recommend that because of the challenging Day 3 descent that is hard enough downhill (I can’t imagine doing it uphill). People have done it before, though.
I would not do Days 3+4 together (I did, and it kind of sucked (22 miles/36km)).
You can do it in 2 days/1 night if you’re fit and push for it (stay at the Paso del Viento hut). If you’re a trail runner seeking to break the 12.5 hr record, good luck!
General hiking tips
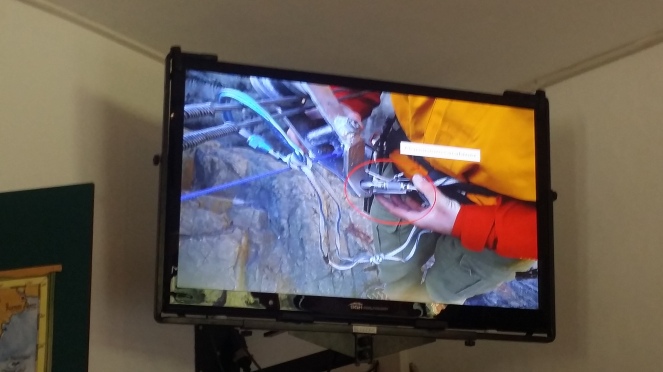
If you are not familiar with rock cairns (highlighted circle below) make sure to familiarize yourself with them (for all hikes in general). These are essentially piles of rocks neatly stacked on top of each other, usually meaning a human purposefully placed them there to usually signify it’s the trail.

This picture is from Backpacker Steve’s video of the Huemul Circuit where he uses them throughout the trail. If you see a rock cairn, you should generally follow it as it means that’s where the trail likely is, but also make sure to use common sense.
Also, DO NOT leave trash at campsites; this is an early lesson in trekking. Take it with you. The rangers will underscore this too; bring a separate garbag bag with you. Now regarding soiled toilet paper specifically, technically one should, though most people won’t. If you intend on burying it at campsites with your waste, PLEASE bury it DEEP in a hole FAR AWAY from water sites.
And when you’re washing things at campsites, be mindful to not contaminate water. For instance, rather than washing your dirty utensils/bowls directly in a stream, take water in a clean bottle and pour it in your dirty utensils AWAY from the water source. It’s extra work, but if you clean stuff directly in the water sources, you contaminate it and risk other people getting sick.
Be BOLD, start COLD. You generate so much body heat when hiking. If you layer up too much when you start hiking in the cold morning, you’ll end up taking it off on the trail after about 20 mins or so.
Before the trek
Personally I recommend getting breakfast at Chalten Suites hotel ($12/person for a legit buffet full of eggs, fruits, nuts, cereal; you’ll want to eat AS MUCH as you can given how expensive food is in Argentina and how much energy you expend on this hike). If you’re looking for a good hostel, I can’t recommend Hostel Aylen Aike enough. Sebastian (the owner) is awesome.
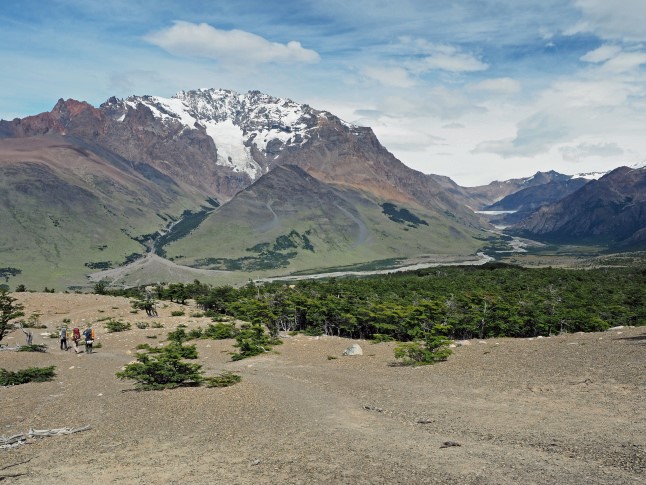
Day #1: El Chalten to Laguna Toro. 10 miles / 16 km.
You ascend ~2500 feet and descend 2100 feet. Usually takes about 5 hours if you’re continuously moving, and about 7 if you’re taking breaks to relax and enjoy the view.

If you have time, you can also make a side trip to Loma del Pligue Tombado to get a 360 degree panorama of the park, or do it a separate day hike later. It’s the 2nd best day hike in the park behind Fitz Roy, in my opinion.
The only salient things to mention are this
- There is one part towards the end where the terrain may be super marshy and your shoes can get wet pretty easily. It’s nice if you have water-proof shoes, but they’re not necessary.
- There are parts where you may have to cross a small stream but there’s no log or bridge over it. This is where I highly recommend having croc-type sandals with you that fasten around your feet.

IMPORTANTLY, when you set up camp, be very aware that mice frequent this area. Wrap all your food in MULTIPLE bags (i.e., put one bag in another, and in another) and seal them TIGHT to avoid any odor from the food reaching outside. Otherwise the mice can easily bite through your tents and backpacks to try and get to the food.
Day #2: Laguna Toro to Paso del Viento refuge hut or Laguna Ferrari:
8 miles (15km), you ascend 3000 feet, descend about 2200 feet. This part can take about anywhere from 5-8 hours.

I’d start SUPER early on this day. For one, a large line can develop at the zipline, and you can EASILY get stuck here for 30-60 minutes waiting for people to cross the zipline. But more importantly, having the South Patagonian Ice Field all to yourself from Paso del Viento is a lifetime memory you will never forget. It’s still awesome even if there’s multiple parties. But getting it devoid of people is totally worth it.
If the weather is bad, you should have a low threshold to NOT attempt the mountain pass, even if that means waiting one more day at Laguna Toro (bring extra food!). You will either use the Tyrolia zipline or ford the river by foot.
If the river level is low (ESPECIALLY if it’s like this), you can certainly consider fording with your shoes (without socks) or hiking sandals.
Use your best judgment; most people use the zipline, and many say it’s a highlight of the trek. It is maintained by the park authorities during the trekking season, but it’s the one option where you have absolutely no margin for error.
What if I just want to use the zipline?
You can watch lots of Youtube videos of people crossing it. And see my section above “How do I use the zipline.”
It’s good to get to the traverse as early as possible in the morning so that you don’t get stuck waiting behind a super long line incase the trek is crowded that day.
If you fall into the rocks and river below, you will either get seriously injured or die. The risk of anything happening is low, but you have no margin for error.

One VERY important point: on the opposite side, it is really steep as you get off the zipline to step on the rock (refer to this video and see how carefully the person gets off).
We actually saw a British couple accidentally drop one of their bags into the river as the guy was sending the bags across to his girlfriend on the opposite side. When the girl tried to unclip the bags off the zipline, she couldn’t get a good grip b/c of the awkwardly steep position she was standing on the receiving end.
They luckily got their bags back. So if you do the zipline, do be mindful of that steep slope as you step off or send your bags across to someone on the opposite side.
I would not do the zipline with your backpack on. Others recommend moving it with the pulley afterwards or clipping it on and moving it behind you. Also, make sure a return line is attached if you’re sharing carabiners or rope. And it’s also a good idea to use gloves here given the thick cord.
What if I just want to ford the river and not use the zipline?
This can be a good option to consider if you find a part of the river that’s only ankle or shin deep. Usually, wherever you cross the river, you can find your way back on the mountain pass trail. But it entirely depends on the water level that day.
If you do this, I’d recommend investing in hiking sandals with grip or crocs. I would not cross without hiking sticks or a long stick you pick up from the trail. Refer to this video to see how to ford a river with a stick. Position the stick in the direction of the river’s forward flow, and push off of it as you slightly thrust against the river’s flow while walking forward.
If I were doing this hike a 2nd time, this would be the first option I’d consider. If you watch my video below, sometimes you get lucky and the water level is not high at all; it’s just freezing, and can get slippery. If I couldn’t find a good place to cross, only then would I do the zipline.
You may want to unclip your backpack’s hip belt if you ford the river. Though not very likely at all, if you fall in the river, and if the current is strong, your backpack’s weight can carry you down the stream, and it would be important to take it off quickly.
Bear in mind, if you only plan on fording the river, and if you’re just making a day trip to Paso del Viento, the water level is usually lower in the morning and higher in the afternoon / evening (more sun = more ice melts = more water in the river). This is why you need the harness with you just incase the water level is too high on your way back.
If you cross where the maps.me route recommends to ford (i.e., right before Rio Tunel empties into Laguna Toro), I’ve heard it can be about shin deep, though I’ve also heard other ppl say it’s the shallowest part. This is what it can look like. Where my friend and I crossed was just upstream of the traverse (the red arrow below), where it was just about our ankles (see my video below). But it may be different day to day.
Above, you can see my friend wading through shin-deep. Indeed, if you’re lucky, it’ll be a relatively easy pass. Still, BE CAREFUL; you’re stepping on some uneven rocks.

Approaching the Glacier Tunel Inferior
Next, you go to the beginning of Glacier Tunel Inferior. Given frequent rock slides, the exact path to the glacier may change week to week; generally, take the path of least resistance. This part can also be easy to lose balance on.

You can see the maps.me route below which minimizes the amount of walking spent on the glacier. Sometimes walking on the glacier is actually safer than scrambling on the loose moraine, and sometimes the gravel/rock is safer; use your best judgment based on the conditions that day.

Don’t follow the maps.me route religiously for every step. Use it to know where your general sense of direction should be and where to get off of the glacier.
Walking on the glacier is a unique experience. Normally you have to pay hundreds of dollars to have a guided expedition on a glacier in Patagonia. But now don’t go exploring the whole damn thing, b/c there are risks. Specifically, there are cracks (or crevasses) scattered throughout the glacier.
If you’re out there alone and you slip into a deep crevasse and can’t get out, you can die of hypothermia. I am not exaggerating. That’s probably the worst thing that can happen to you on this trek, other than falling from the first zipline.
Most of the crevasses are small. And you usually don’t venture near the big crevasses to cross it (you only spend like 5-10 minutes crossing). Just pay attention, and you’ll be fine. I would only consider exploring it if I had cramp ons.

Next comes a very important part. At some point, you have to exit off the glacier and get onto the mountain pass trail. Where and how you do this is EXTREMELY important, and I cannot emphasize this enough.
Unfortunately, given the frequent rock slides, the trail will frequently change at this part. Importantly, just b/c you see a rock cairn does not mean that it’s the right path (i.e., that may have been the right path BEFORE a rock slide obscured the path). Similarly, an old GPS route you see on maps.me or a GPS file may be outdated (use common sense and don’t follow a path if it looks sketch).
This part tends to throw off a lot of people, so do your research BEFOREHAND by closely examining my diagrams below and looking at the path on Google Earth in 3D. See this example video of how people can get confused and lost if you’re not familiar with this part.

In the picture above, at the end of the glacier, you’ll reach a point where the river carves through the glacier (noted at the end of the FIRST arrow in the pic above, and in the real life photo below). This is roughly where you should exit the glacier.
You then advance along the river and ascend as you reach the lake. If you look closely at the end of the 3rd arrow, you can actually see the beginning of the mountain pass trail on Google Earth itself. This part close to the 3rd arrow rarely gets obscured by rock slides, so do your best to get here. Once you get from the glacier to this point, you’re golden, and it’s fairly straightforward to get up to the summit.

In the picture below, see where these people are in relation to the lake near the 2nd glacier? This is where you should aim for to find the path.


You’ll also eventually come across an old campsite, Camp Rio Tunel, on your way from the glacier to the mountain pass trail (I personally wouldn’t recommend camping here)
Ascending up the mountain pass
Next you start ascending up the mountain pass. In my Google Earth photo below, you can see the actual mountain pass trail (it’s the brown line above my blue arrow)
At some point, there’s a bifurcation point where you can either go left on a trail up the mountain (a bit more steep), or right on another trail (a bit lower than the trail on the left). I would just take the one that went left, I think it gets you up the mountain a bit quicker. Or, if you don’t see what I’m talking about, don’t worry.
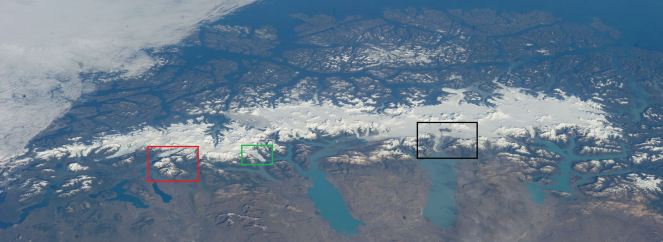
You’ll reach the top of the pass, Paso del Viento. Absorb the spectacular view of the South Patagonian Ice Field. If you wanted to propose to someone, and especially if you had it all to yourself, this would be the best place in Patagonia to do it from. Trust me. This Ice Field is the 3rd largest reserve of fresh water in the world; what you’re seeing from up there is the black box below. Can you believe how big it is?
To advance onwards, as you’re looking straight at the Ice Fields, look down and towards your left. The slope down looks steep, but is the usual route people take.

As you’re looking towards the ice fields, the hut is towards your left (south). You can also go to a campsite in the north near Laguna Ferrari (as per picture above, North), which usually sees people coming from an ice field trek from the north. You may find it to have more solitude.
The benefit of the Paso del Viento Hut area is that can you can enter the hut if the wind gets bad, though if the trek is super crowded on any particular day there’s only so many people that can pitch their sleeping bags in that hut, and it’s far more comfy to be in your own tent than in a hut which frequently see mice eat scraps of food.

At the Paso del Viento campsite, I recommend camping right next to the shelter so that you can quickly access it with your sleeping bag if the weather gets bad, but be careful not to pitch your tent in areas where water may collect.
Also, make sure you get your water from RUNNING streams, and not the actual lake. I’ve read blog posts where trekkers found some other people literally swimming in the lake. They’re not supposed to because it contaminates it, making it unsafe for everyone else.
And if you intend on leaving soiled toilet paper here, PLEASE make sure you bury it DEEP with your waste FAR AWAY from any water source. Nothing worse than coming across other people’s trash.
Remember, make sure your food is sealed tight so that mice don’t eat through your tent / backpack. I’ve heard of people hanging their food in bags in the hut (i.e., if it’s hanging from the right spot, mice shouldn’t be able to access it).
On a side note, sometimes guided tours will have you leave from this campsite to go explore the Viedma Glacier and Patagonian Ice Field (usually done as a separate day). If you look at the moraine hill above the campsite, you can sometimes access the ice fields from here.
This sounds super exciting and all, but remember the risks. Most expeditions on glaciers are guided for a reason. You need cramp-ons and ice-axes, and the danger of falling into crevasses is real.
Day #3:
Paso del Viento Refuge Hut to the Lago Viedma campsites: 11 miles / 18 km, you ascend 2100 feet and descend 4400 feet.

The next day you continue on the trail towards Paso Huemul (mountain pass).


You’ll see blue berries (Calafate berries) throughout this day. In Backpacker Steve’s video of the Huemul Circuit, they ate them. I’ve read on numerous blog posts that they are edible and super sweet. You can do whatever you want. I’d also ask the park rangers beforehand.
Eventually the trail gets narrow as you’re on the mountain wall ascending towards the pass. If there’s no wind, don’t worry. But if there is wind, then you have to BE EXTREMELY CAREFUL as there is a real danger of getting blown off a cliff. Bend your knees to maintain your center of gravity, or even make sure that your left hand is always touching the mountain wall.

See the narrow trail and cliff above? When I did this part, the wind gusts were as high as 100-120kmh. Per the park rangers, the winds come from the same Westerly direction from the Ice Fields. It will be pushing you into the mountain wall to your left (like in this video), not towards the cliff and Patagonian Ice Fields on your right, but it can still throw you off balance.
Interestingly, many trip reports I’ve read had almost no wind on this part. So don’t let my experience completely deter you. Eventually, you get to a point where you’re just ascending up the mountain pass, and the wind will actually give you a little boost up from the back.

When you get to the top, you can try leaning into the ice winds to get some awesome video footage.
Moving onwards from the pass, the park rangers will tell you in their presentation to keep left, not right. I think my friend and I initially turned right and couldn’t find a way off the mountain. Keep left. And you can also use the maps.me app if necessary.
There’s a campsite up here which is now closed. You can take a break and get some water, but you should be descending. It’d kind of suck to do this descent on the last day b/c you’ll be extra tired for the 18km walk to town. Not to mention, if the weather changes and it starts to rain, the descent will be even more riskier.
Also, per the picture below, there is a small mini-trail near the old-campsite where you can get excellent views of the actual Viedma Glacier terminus.

Next, you start an 700m vertical descent over 1200 horizontal meters. It is the toughest part of the hike (in terms of how much it just sucks, not technically challenging). This video characterizes very well what the descent is like (it may not look crazy challenging, but over 2-3 hours, it’s a test of endurance)

Above, the red circle represents the elevation profile of this part (i.e., it’s the steepest part of the trail). Most blog posts acknowledge this part is indeed steep, but definitely feasible. When I did it, it took away a lot of my stamina; there’s also a very real risk of developing blisters if you go too quickly.
It’s highly advised to really take your time with this section. This will help your knees tremendously. One false step can mean serious injury. Don’t hesitate sliding on your butt or bag. And it absolutely helps to have hiking sticks for this descent.
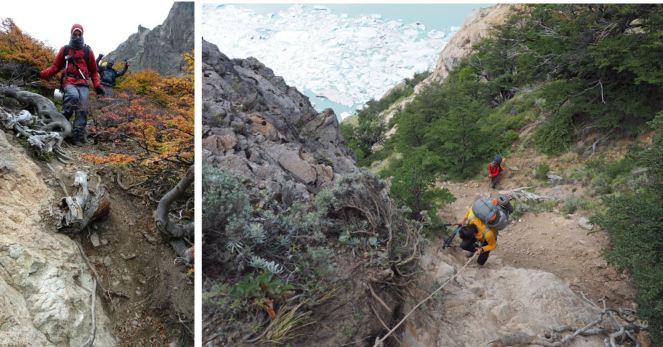
There’s a point where there’s a rope put in by the rangers to descend 20-30m. Be very careful on this part. It’s best to have your feet push off of solid rock rather than dirt as you’re going down on the rope. I’ve heard some people say the rope isn’t 100% necessary to go down, but I don’t see why one wouldn’t use it.
Eventually you reach the lake. This scenery is super idyllic. There are two options for camspites (use pictures below as reference; either you camp at the end of the descent (Bahia de los Tempanos), or on Peninsula Ventisquero itself (Bahia de Hornos)
On the peninsula, you get your water from Lago Viedma, but remember, cows graze this area (and could do so in the streams), so just be mindful where you’re getting your water from and use a filter if necessary. From many of the videos I’ve seen on the Huemul Circuit, this is where many people end up camping b/c of the sensational views you get for sunset and sunrise on the glacier, and you get an extra 1 hour headstart the next day.
Once you’ve set up camp, you have a few options for fun. Numerous videos I’ve seen show people swimming in the lake, climbing on top of some of the icebergs for some interesting photo ops, or just exploring the area without your backpack.


On the picture above of the peninsula, see the red pin at the very top? This is a spot my friend and I relaxed on for about 30 mins. There are lots of good places to sit and relax, but I like this one in particular as you get sensational views of Viedma glacier, the surrounding mountains, and the lake (as per picture below)

Lastly, as you go to bed, I would HIGHLY suggest waking up for sunrise, even if it’s Patagonian summer where sunrise is SUPER early. Yes, you’re dead tired, but years from now, you’ll remember the awesome view of the sunrise you saw, not the sleep you lost.

Day #4:
Lago Viedma to the boat terminal (11 miles, 18km; you ascend and descend about 1400 feet). Can take anywhere from 4-6 hours.
TWO IMPORTANT THINGS:
FIRST, if you get to the boat terminal too late in the afternoon, you might lose your window of opportunity to hitchhike a ride back to town. If this happens, you just walk 5km to the Estancia la Quina hotel on the way back and call a taxi back from there. Look at the maps.me route to find where the trail goes north from the boat terminal. There are two boat tours at 10 am and 3 pm, so you want to be at the boat terminal by 4-5pm pm at the latest to ensure you get a ride. I’ve also read more recent trip reports where the boat tours are sometimes not running; you can clarify with the rangers.

SECOND, there’s a long stretch of maybe 10km or so from the 3rd campsite to El Chalten where you won’t find much running water. Make sure you’re adequately hydrated before you start going through all the rolling hills. And even if you do find water, make sure that it’s ONLY running water, not stagnant water. You’ll eventually find running water about 1-2km before the next river crossing.
The rangers have put in a lot of red sticks along the trail for you to follow through all the rolling hills. I’ve heard of LOTS of people getting lost on this part, as well; use maps.me if you have trouble. You’re essentially following the coastline to your right (picture below). Stay close to the lake.
Eventually you’ll reach a point where you can go left to reach the 2nd traverse, or straight/right to ford the river (there used to be a sign of both directions, which I think they’ve since then removed).
When I did the circuit, we couldn’t use the pulley since it was on the opposite side, so we had to ford the river downstream.
Personally I would just use the tyrolia here, as fording the river downstream is a massive undertaking. The Tyrolia isn’t so bad; you can practically touch the water so an accidental fall here wouldn’t guarantee your demise unlike the first one. More weight increases the chance of you touching the water, so you can send your bags across separately if you find that to be a problem. Also, this is the same exact river from the first Tyrolia: Rio Tunel!

If you ford the river, you have to walk 100m downstream (some people say this river is not ford-able, but they’re usually looking at the part below the Tyrolia). Make sure you cross it at its shallow-est portion (and I think also its widest portion). And you have to be careful if you’re crossing it later in the day since more ice will have melted, making the water level deeper.
In the picture below, I forded the river at almost 9 pm after 20 miles / 34 km.

Reaching the boat terminal
You will soon reach the Boat Terminal. Congratulations!
You have a few options here to get back to town. There are buses and cars coming throughout the day. You have to get lucky and try and hitchhike from here back to town. If you get there too late in the day, you won’t have many options to get back to town (especially after 3-5 pm). Even if you have to pay, remember that doing the trek was essentially free, and you deserve a break after doing one of the best hikes you’ll ever do in your life.
If you can’t get a ride back, you can walk like 3 miles/5 km to a hotel (Estancia La Quinta) which you’ll see on the maps.me route that leads back to El Chalten. From that hotel, you can call a taxi to take you back to town (like 10-12USD). Otherwise, you can walk 6-10km back to town from the hotel. Personally I’d recommend just calling the taxi.
In the picture below, the arrow goes from the boat terminal to the hotel, which is close to El Chalten.

DO NOT FORGET: the registration copy that the park rangers gave you, you MUST return it to the office to let them know you’ve returned. They have a box outside which you can put it in if they’re closed. If you don’t return it, they’ll send a search and rescue for you.
Food after the hike + Recovery
Once back in town, I recommend eating as much food as possible now. Your body needs some serious calorie load after that hike. And protein as well. I liked the restaurant Patagonicus as they have good pizzas. Domo Blanco has some of the best ice cream I’ve had (try Super Domo flavor). Otherwise even if you go to the grocery store and stuff your mouth with a bunch of carbs and cook up some eggs, that works too.
One thing I can definitely recommend is the breakfast buffet at El Chalten Suites hotel. I think it’s like $10-12, which might be expensive for a backpacker, but if you’re a serious hiker and go in there with an empty stomach, you can get an enormous amount of calories as they serve fruits, nuts, cereal, unlimited omelettes, tons of pastries.
FINAL IMPRESSIONS: this trek is getting more popular each year, but it is still somewhat of a hidden-gem. The sheer beauty of it is incredible. It is very difficult even if you don’t account for the Tyrolia ziplines. Eventually I think the park authorities might build bridges over the rivers, though as one other blogger said, the Tyrolia act as gatekeepers to the trek, ensuring that only those willing to do the zipline (i.e., serious trekkers) do such a technical and challenging trek.
FULL DISCLAIMER: This is all my own personal advice, but you should follow it at your own risk and take all my advice with a grain of salt. You should be aware of what you’re getting yourself into. This hike has its own set of challenges and you should not do it unless you are fit and competent enough to do it. The Huemul Circuit is a trek worth doing even with all its risks, in my opinion, but there definitely exists very real dangers if you do not know what you’re doing.
Comment below if you found this guide helpful and share it too!
Also, my post uses a combination of my own photos as well as other blogger’s photos (to ensure I can show all parts of the trek where I otherwise couldn’t take photos). Credit for select photos goes to BackpackerSteve, 2driftingcocounts, fromcanyons2clouds, katieandkay, Richard Pattison, and bemytravelmuse.

Superb post. Really well written, detailed, informative and helpful.
LikeLike
Thanks, Jake!
LikeLike
In the time you wrote this text i made the circuit twice with half of the weight of your packing list…
LikeLike
Lol. Thanks for the kind feedback, Chris. I think this underscores a great point about the wide range of trekking expertise out there. Mountaineers who hike this trek will casually stroll by, only needing to know that you need a harness and a general sense of where to go on a map. Someone who’s a beginner hiker may actually need this volume of information because there’s so much that can go wrong if you don’t know what you’re doing. I certainly don’t expect anyone to follow my route step by step, or carry what I would recommend, kilo for kilo.
People can read this guide and take away whatever they deem salient or useful. There’s only a handful of technical guides out there on this trek, and that’s why I wanted there to be at least one detailed resource available online. You’re welcome to recommend your own packing list or write your own shorter guide, though 🙂
LikeLike
Thank you for the great info! I was wondering if it was possible to hike the Huemul Circuit in the winter (July)?
LikeLike
Hi Maryssa, I would personally not recommend to do it in July. El Chalten practically shuts down from what I’ve heard during the Patagonian winter. There may also be considerably less support from the parking rangers incase something goes wrong. I’m not even sure if they’ll give you a permit, though I’d check with them. The earliest I’d personally consider doing this trek is October. Could maybe do September.
LikeLike
I completed the Circuit in March. What an amazing adventure. Beautiful scenery. I was lucky with the weather – no rain 🙂
Your guide really is invaluable. I cannot emphasise enough how well put together it is and how helpful to me it was. I did the trek solo and was nervous about doing this trek alone. I needed to do some research to make sure I was properly prepared and knew what I was doing. This guide was thorough enough to give me thee confidence to go ahead.
The only point I would make would be to reinforce the point you make about making sure you know how to use the harness properly. I would recommend buying your own harness before you go as rental in El Chalten is extortionate and if you buy your own you can make sure you are completely confident with how to use it before you go.
LikeLike
Hey Jake, thanks so much for the feedback, really means a lot to me. You can probably imagine how much time I spent writing this guide–it was especially geared towards people like you who have the physical fitness to do the hike but need more assurance and guidance on the technical and navigational aspects before pulling the trigger. I’m happy if a little time on my part can contribute even a little bit to people being able to experience this hike. Glad you had a great time on the trek. A truly magical experience. And thanks for the bit on the harness. Not sure which harness in particular to recommend. If it’s for a short trip to Argentina, I think totally reasonable. If one is backpacking for multiple months through South America, then might be a bit more challenging to carry the harness for weeks before and after going to El Chalten. And just glanced at some prices on Amazon. To get all the parts could be slightly pricey (maybe like $60-$100), though not unreasonable if one plans on using it again.
LikeLike
Nice guide ! What is the best season for this hike ? Thanks !
LikeLike
Thank you, Christopher! That’s actually a great question and one I’ll definitely have to update the guide with. The Patagonian summer is probably the most ideal time, which is from December through February. The temperature will be most optimal, but the winds usually run much higher. You can do the hike from October through April–the fall/spring seasons are usually colder and can have more snow, but I’ve heard there’s usually less wind.
LikeLike
We did it in the third week of October 2018, and were extremely lucky with the weather (perfect hiking temperatures if you have mountain clothing and a -6°C/20F sleeping system, sunshine and almost no wind on the first 2.5 days). But only a week before there was heavy snowfall and even roads were impassable. So it may be a bit of a gamble then and require flexibility in your planning.
LikeLike
Hello! Thanks a lot for this super guide. Me and my son will be trying the Huemel circuit in march 2019
LikeLike
Your welcome. Best of luck with the Circuit!
LikeLike
Extremely useful guide.
I did the trek last October 2018, in the second day, I run out of light next to Tunnel Glacier and had to spent the night next to it without a tent!
Happily my sleeping bag saved me (it is good up to -22 C, Climashield apex one) and also the following day a couple from USA and my partner in the trek, Tom, joined me and we continued all of it safe and sound.
It was an amazing experience, just be very careful planning it ahead, especially when do it alone.
Tip: I won’t get any place to buy dehydrated meals in El Chalten, at all!
Since keeping low weight is key if you are going on our own, try to get it in advance.
LikeLiked by 1 person
As of late December 2018 the boat tours from Bahia Tunel are no longer happening. When I arrived mid-day, there were no cars, buses, or people. This will make hitchhiking unreliable. Alternatively, From Bahia Tunel, you can walk a path north through the cow fields. When you reach a house (just before Estancia La Quinta) there is an obvious path to the left and up. Go uphill, hop over the gate and follow this path. It will lead you generally northwest towards the Laguna Toro trail that you started out on. When you reach the trail just go downhill to the ranger station. It may be best to use GPS or a topo map for this section, but It does look like others have been doing this. It probably adds 5 miles or so, but considering the rest of the trek, this is pretty easy terrain (it took me about two hours) and you don’t have to worry about trying to find some way to get back to town from the boat terminal. This also turns the Huemul circuit into a full loop with no road walking.
LikeLike
Interesting. I glanced at the maps.me part of the region. I don’t see a clearly marked trail that goes from Estancia La Quinta (or the area/house before it) to the Laguna Toro trail. There also appears to be a small stream / river in between. Were you able to cross this easily, and was there a bridge?
This is something people can certainly keep in mind, though it may honestly just be safer to either call the taxi from Estancia La Quinta, or just walk on the road from La Quinta to El Chalten, especially for those who may not have strong navigational skills.
LikeLike
The same happened to us there, but we asked for the manager at the Estancia La Quinta to give us a lift to El Chalten, that cost around AR$ 1000.
Anyway, since we were exhausted that was perfect, but instead of going up towards Laguna Toro trail you can just follow the route from Estancia La Quinta to el Chalten directly to El Chalten, perhaps a little bit longer but plain.
LikeLike
Thanks for taking the time to write this up. The extra detail is appreciated. Particularly the drawings with arrows and video clips of the specific troublesome sections were so helpful in determining if I wanted to attempt the hike. Without your information, I definitely would not have considered it.
LikeLike
Hey man, glad you found it helpful! That was the whole purpose I made the guide so exhaustive. It’s funny b/c there’s one dude above in the comments who criticized it being so long. Some of us actually need this amount of detail. And I’ve tried my best to include just the salient parts. That’s why I have a separate post for my personal experience with the hike, rather than the logistics of it. Lmk if you have any helpful feedback at all after finishing the hike!
LikeLike
The best Huemul guide I’ve ever read. Many thanks.
LikeLike
The blog is absolutely great. The following line however turns out to be misleading since there is no glacier view from the 2nd campsite Bahia de hornos:
>> From many of the videos I’ve seen on the Huemul Circuit, this is where many people end up camping b/c of the sensational views you get for sunset and sunrise on the glacier
LikeLike
Hey Sam. Thanks for the feedback. It’s been 7 years now since I’ve done it so I won’t recall little details/names, but I was trying to refer to the campsite on the actual peninsula itself. There’s a campsite at the end of the killer descent from Paso Huemul where you won’t really see the glacier, but from the peninsula campsite, you can.
LikeLike